Digitizing-features-from-an-allmaps-georeferenced-map
Workshop: Georeferencing Maps with Allmaps
goto.stanford.edu/paper2points
A Guide to Converting Historical Maps into Digital Tiles
Part 1: Understanding Georeferencing
What is Georeferencing?
Georeferencing is the process of aligning a digital image (like a historical map) to real-world geographic coordinates. Here’s how it works:
- Image Coordinates: The pixel positions on your scanned map or map image (measured in rows and columns)
- Geographic Coordinates: Real-world latitude/longitude (or projected coordinate system) locations on Earth
- Ground Control Points (GCPs): Pairs that tie image locations to geographic locations
- The Goal: Create a mathematical transformation that converts any pixel location on the map to its corresponding geographic coordinates
Why Georeferencing Matters
When you georeference a historical map, you unlock its data:
- Overlay it with modern maps to understand how things have changed
- Extract spatial data (buildings, roads, boundaries) that existed in the past
- Make historical maps searchable and interactive in web applications
- Preserve the spatial context of historical information
Why Use IIIF-Backed Allmaps?
Advantages over traditional desktop georeferencing software:
-
No Derivative Files Required
- Traditional tools (ArcGIS, QGIS) require downloading, processing, and storing georeferenced versions of maps
- Allmaps works with IIIF sources—the original stays on a remote server, you only store the georeferencing data (GCPs and transformation parameters)
- This saves disk space and eliminates version control issues
-
Instant Access to Millions of Maps
- Davidrumsey.com, Library of Congress, Wikimedia Commons, and hundreds of institutions expose their maps via IIIF
- No need to hunt down downloads or request high-resolution scans
- Work with any IIIF-compliant collection directly from your browser
-
Web-Based Workflow
- No software installation required
- Works on any device with a web browser
- Collaboration-friendly (share maps and GCP data easily)
- Instant tile export for use in web maps (Leaflet, Mapbox, etc.)
-
Superior User Experience
- Smooth zooming and panning at any zoom level
- Ability to layer and compare historical maps
- Easy correction and refinement of GCPs
- Immediate visual feedback as you georeference
Part 2: Georeferencing an Online Map
Step 1: Finding Your Map on David Rumsey Map Collection
Objective: Locate and select a historical map to georeference
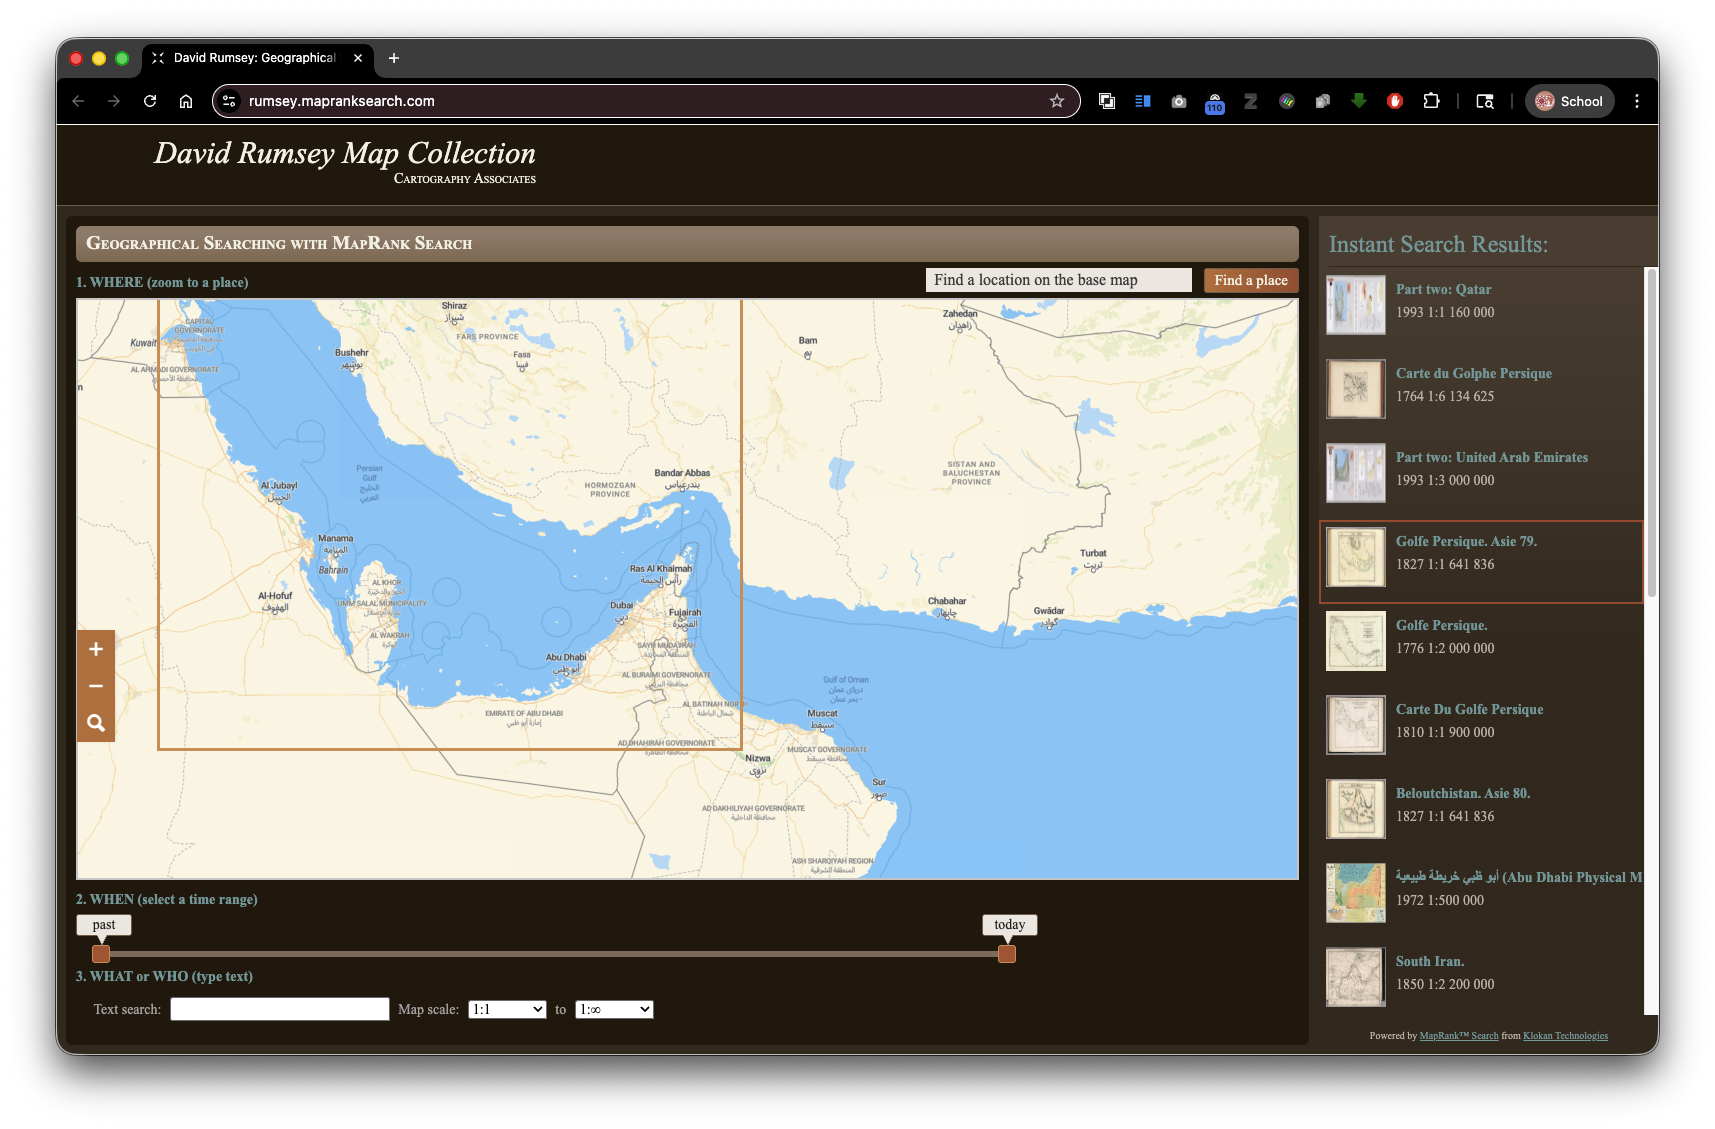
Instructions:
-
Navigate to the MapRank Search interface: https://rumsey.mapranksearch.com/
- This is a fast, map-centered way to search the David Rumsey collection
- More intuitive than the traditional text-based search for finding maps by location
-
Search by Location:
- Use the search box to enter a place name, geographic area, or region
- Example: “San Francisco,” “United States 1800,” “London 17th century”
- Browse the results shown on the interactive map
-
Select a Map:
- Choose a map that interests you
- Recommended for beginners: Select a map that clearly shows streets, major landmarks, or geographic features (these provide easier GCPs)
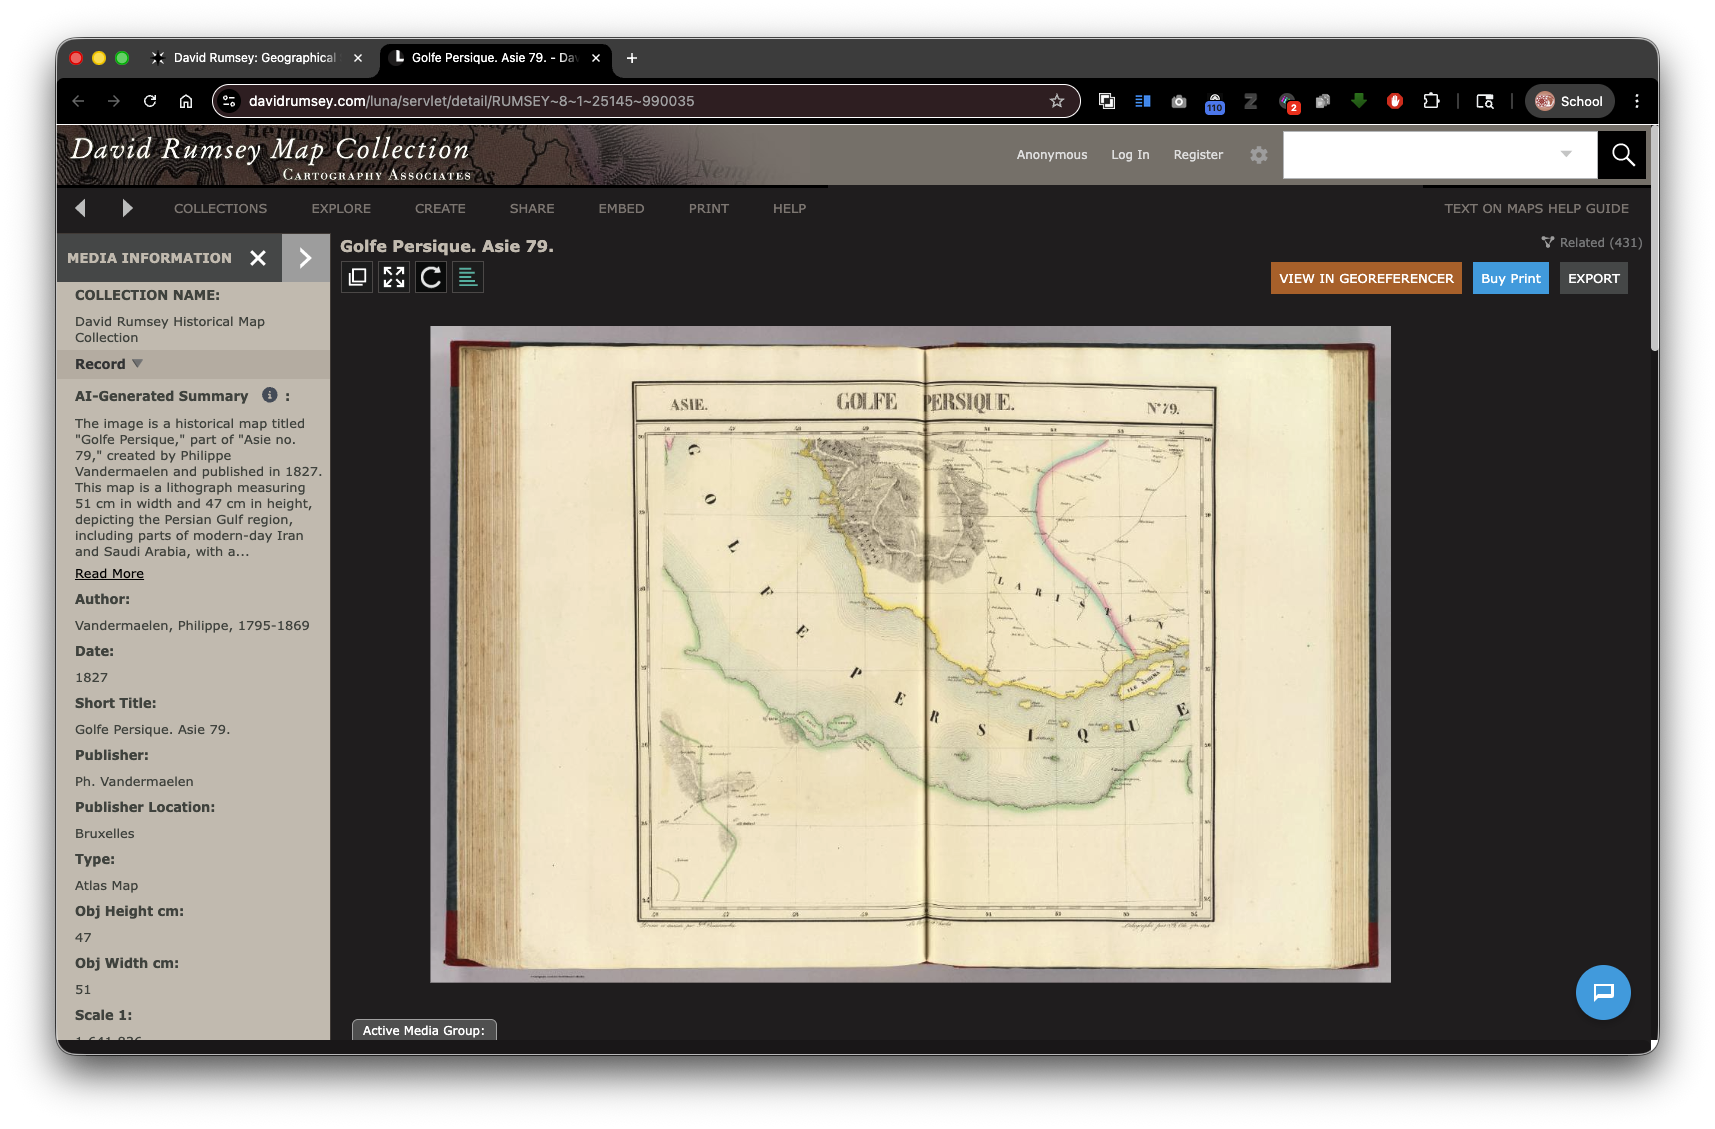
- Click on the map thumbnail or title to open its full record
-
Examine the Map Details:
- View the title, date, creator, and other metadata
- Check the map’s extent (geographic area covered)
- Look for the availability of high-resolution imagery
Conceptual Note: When choosing a map for your first georeferencing project, look for maps with identifiable features. Street grids, major rivers, mountain ranges, and named landmarks make excellent GCP anchors because they’re easy to locate on modern reference maps.
Step 2: Accessing the IIIF Manifest
Objective: Find the IIIF manifest link needed for Allmaps
Instructions:
-
Locate the IIIF Manifest Link:
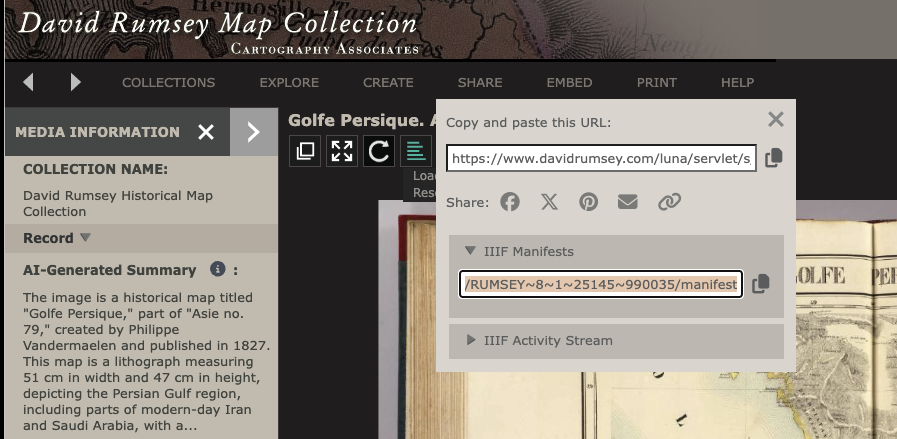
- On the David Rumsey map record page, look for the SHARE menu item, expand it, and then find the “IIIF Manifests” link
- Click ithe Copy icon to copy the URL
-
Copy the Manifest URL:
- The manifest URL will look something like:
https://www.davidrumsey.com/luna/servlet/iiif/p/[ID]/manifest.json - Copy this URL (you can usually click a copy button or manually select and copy it)
- Save it for the next step
- The manifest URL will look something like:
Technical Note: The IIIF manifest is a JSON document that describes the structure of a digital object (in this case, a map) and where its image tiles can be found. It’s the key that allows Allmaps to access and manipulate the map image without downloading the entire high-resolution file.
Step 3: Opening the Map in Allmaps Editor
Objective: Load your chosen map into the Allmaps georeferencing interface
Instructions:
-
Navigate to Allmaps Editor:
- Go to https://editor.allmaps.org/
- You’ll see the Allmaps Editor interface with a search/input area
-
Add the Manifest URL:
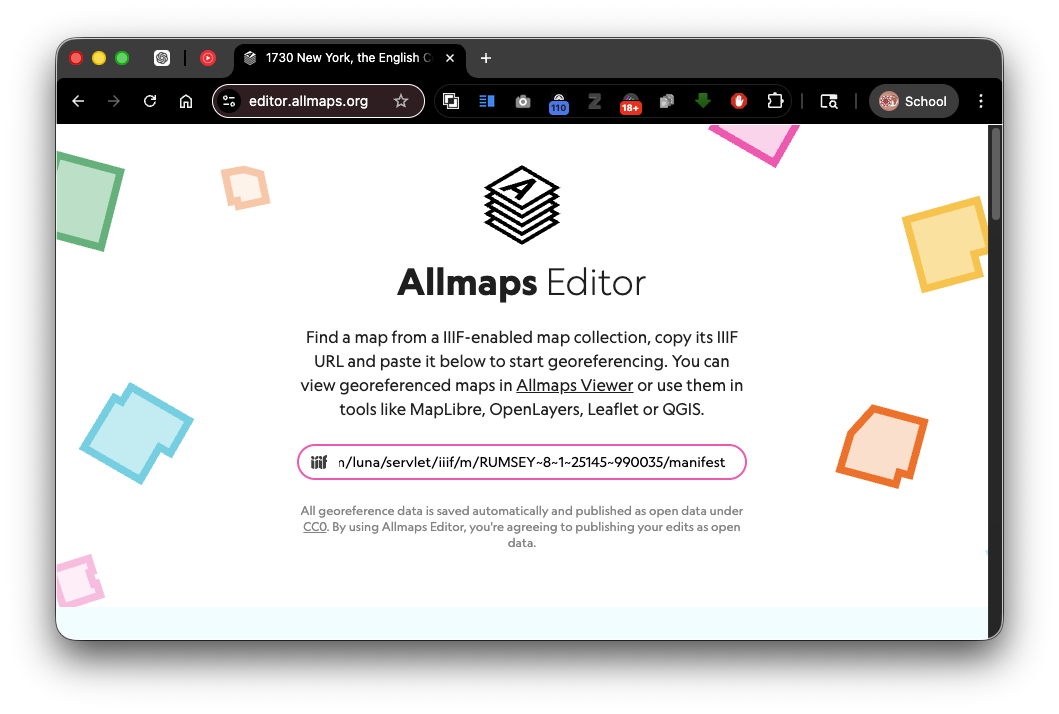
- In the input field (usually at the top or in the left panel), paste the IIIF manifest URL you copied from David Rumsey
- Press Enter
- Wait a few seconds for the map to load
-
Confirm the Map Loaded:
- The map image should now appear in the editor
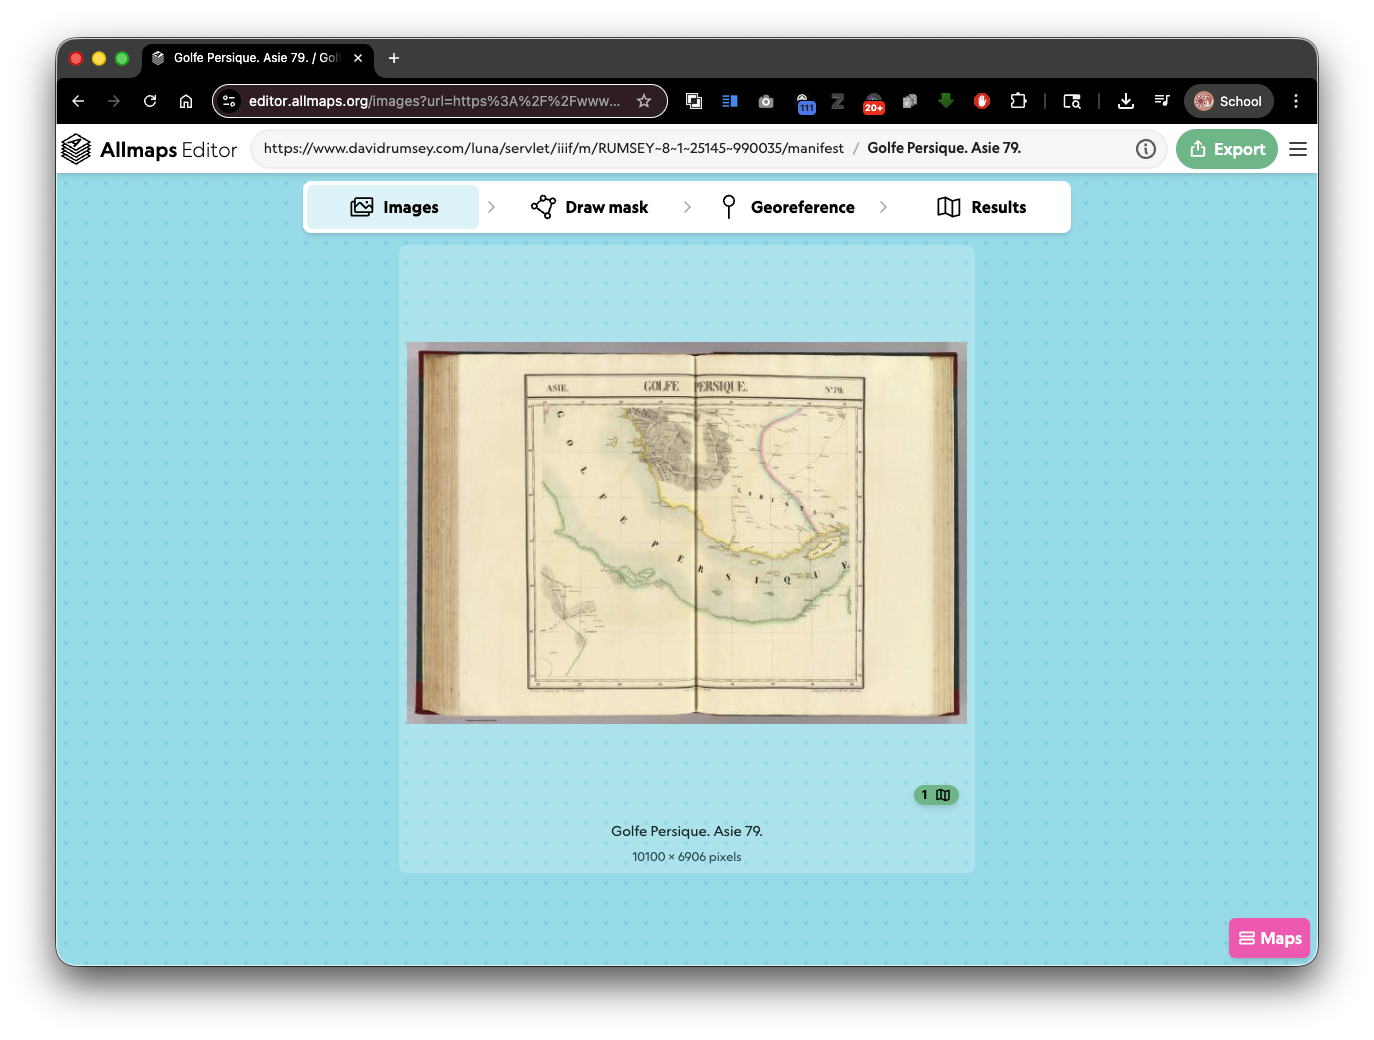
Conceptual Note: By using IIIF manifests, Allmaps streams the map image directly from David Rumsey’s servers. You’re working with a live connection to the original source, which means any improvements you make (the GCPs) can be stored and shared without managing derivative files.
Step 4: Creating a Mask (Optional but Recommended)
Objective: Define which parts of the image represent the actual map(S) (and exclude borders, margins, labels)
Instructions:
-
Why Create a Mask?
- A mask tells Allmaps which pixels are the map data itself, versus margins, text, or decorative elements
- This improves georeferencing accuracy by focusing on the map’s real content
-
Access Mask Tool:
- Look for the “Draw Mask” option in the editor interface
- This will open a drawing tool overlaid on the map
-
Draw the Mask:
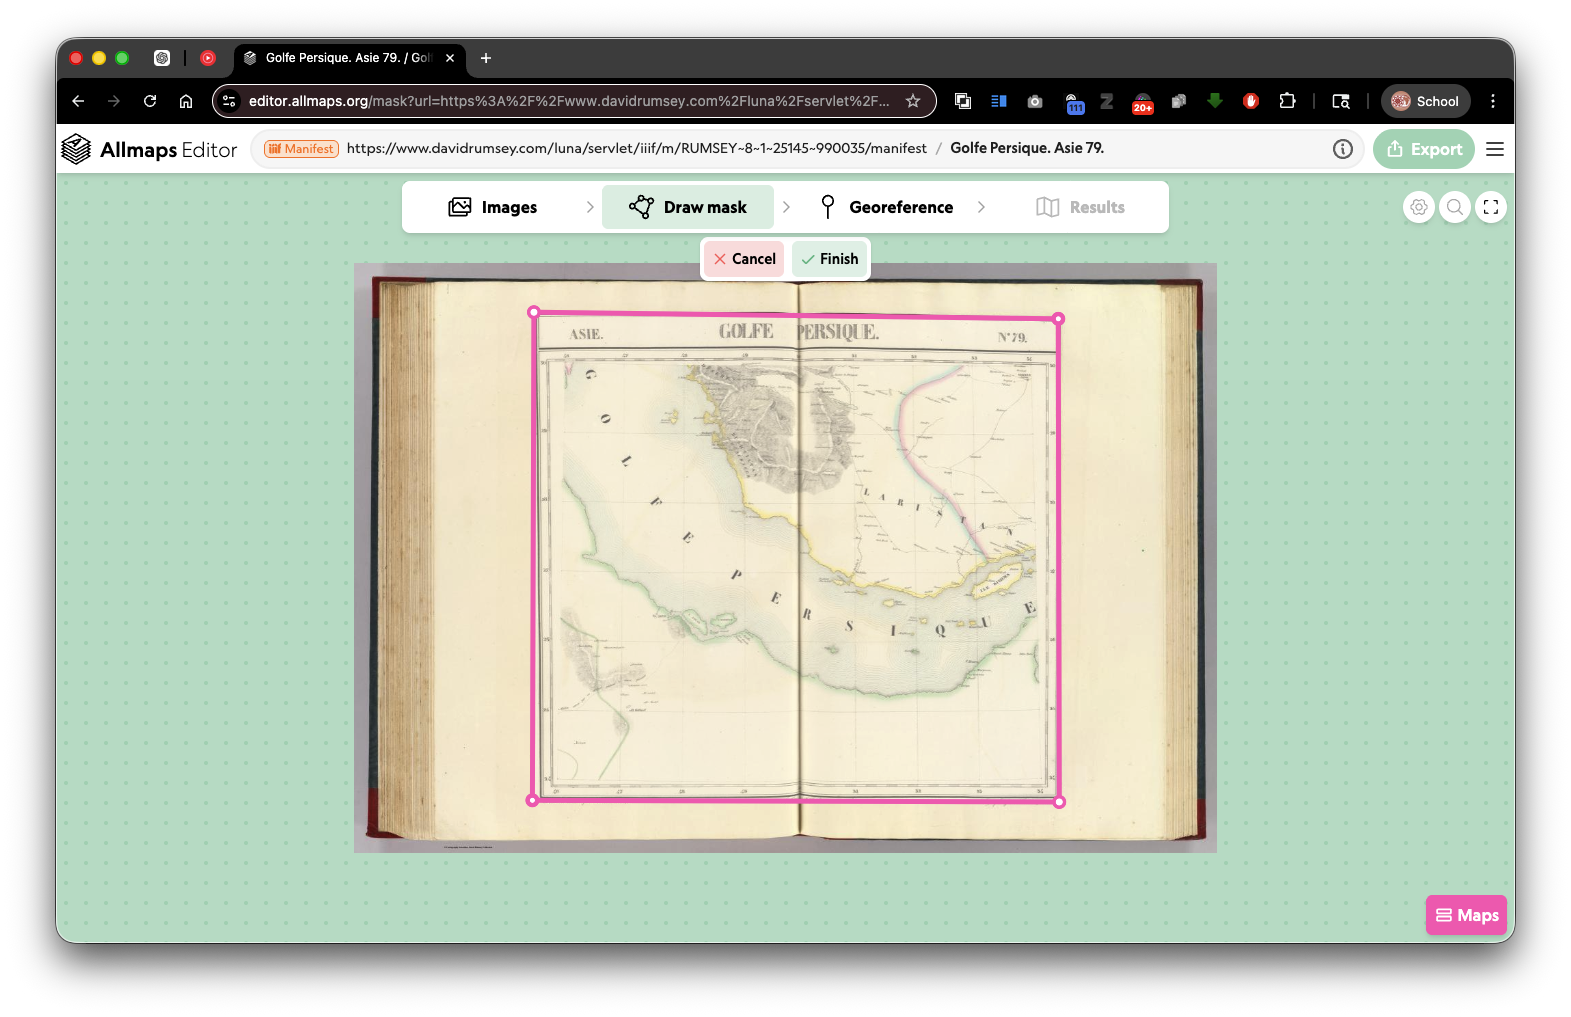
- Use the drawing tool to outline the map area
- Exclude the map’s outer border, title, scale bars, and any extraneous content
- Be as precise as possible—tighter masks lead to better georeferencing
-
Save/Confirm the Mask:
- Once satisfied, click Finish.
- The masked area should now be highlighted in the editor
Optional Step: If you’re working with a simple rectangular map image, you can skip this step. However, for complex maps with decorative borders or irregular shapes, masking significantly improves results.
Advanced Note: The masking application allows you to mask multiple maps within a single IIIF manifest (useful for multi-sheet atlases or collections). Each masked area becomes a separate “Map” in the Allmaps Editor interface, and you can georeference each map independently. This is powerful for historical map series where each sheet needs its own georeferencing.
Step 5: Georeferencing – Adding Ground Control Points
Objective: Create the image-to-geography coordinate pairs that define the transformation
Instructions:
Understanding GCPs:
- Each GCP links one image location (pixel on the map) to one geographic location (latitude/longitude on Earth)
- You need at least 3 GCPs for a basic transformation, but 5-10 or more are recommended for accuracy
- Choose GCPs that are:
- Spread across different parts of the map
- Clearly identifiable on the map
- Locatable on a modern reference map (Google Maps, OpenStreetMap)
Adding Your First GCP:
-
Start Adding Control Points:
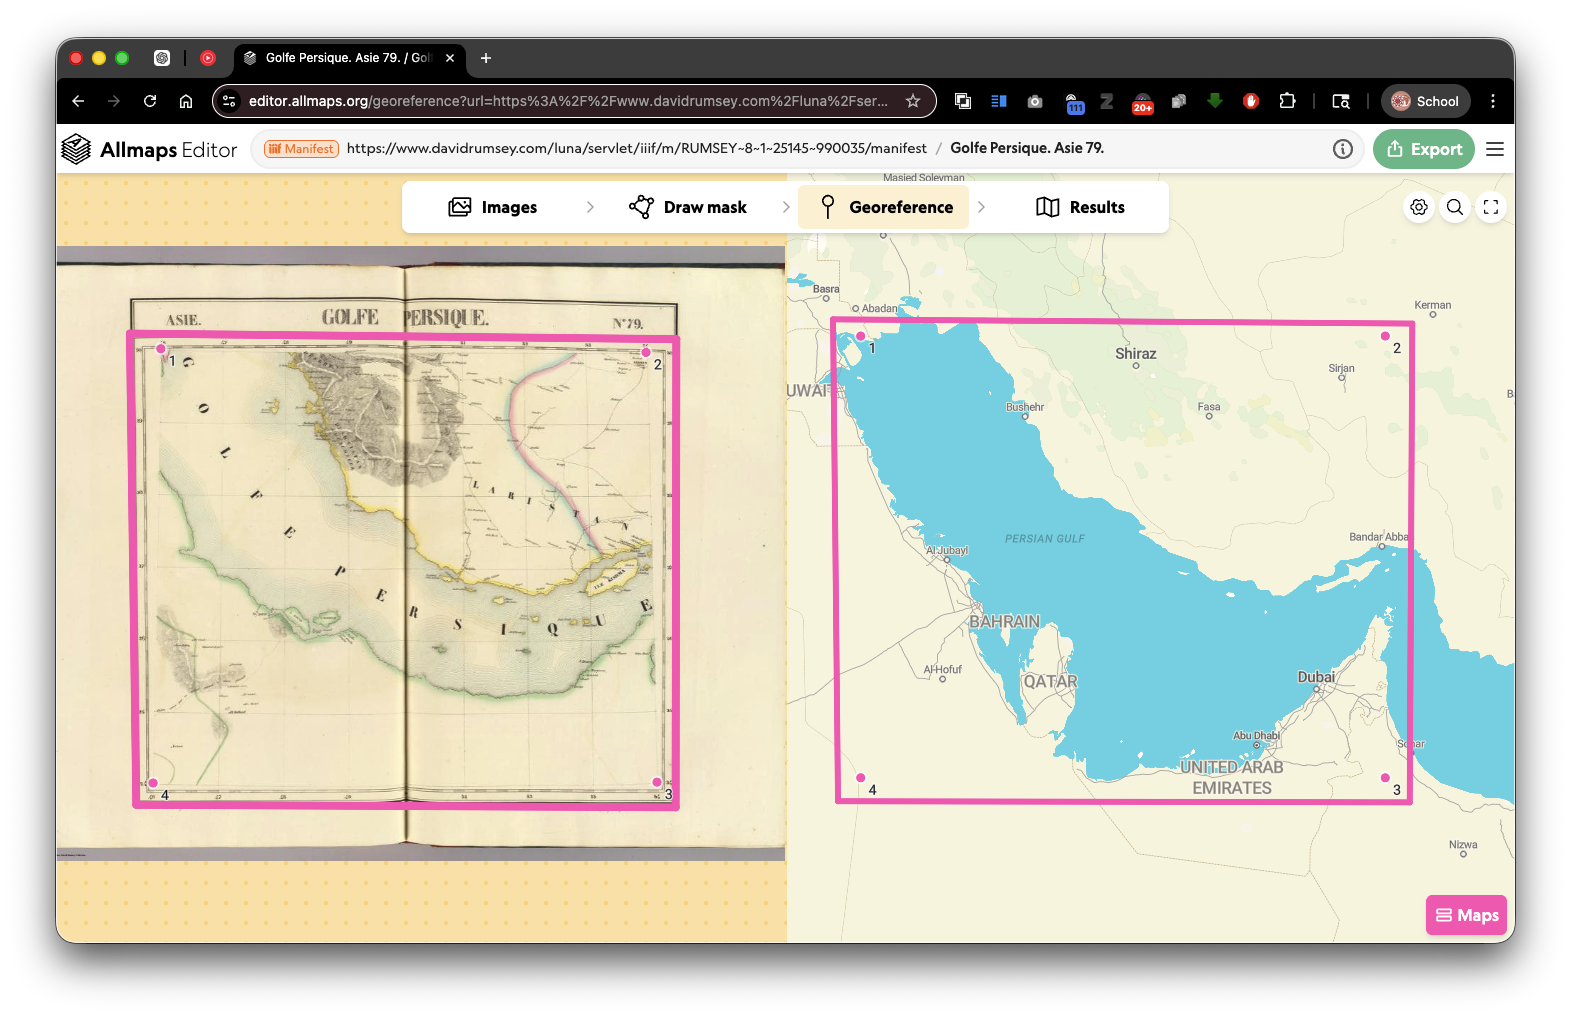
- Click the “Georeference” Tab at the top of the page.
- You now have two panels: the historical map on the left, and a modern reference map on the right.
-
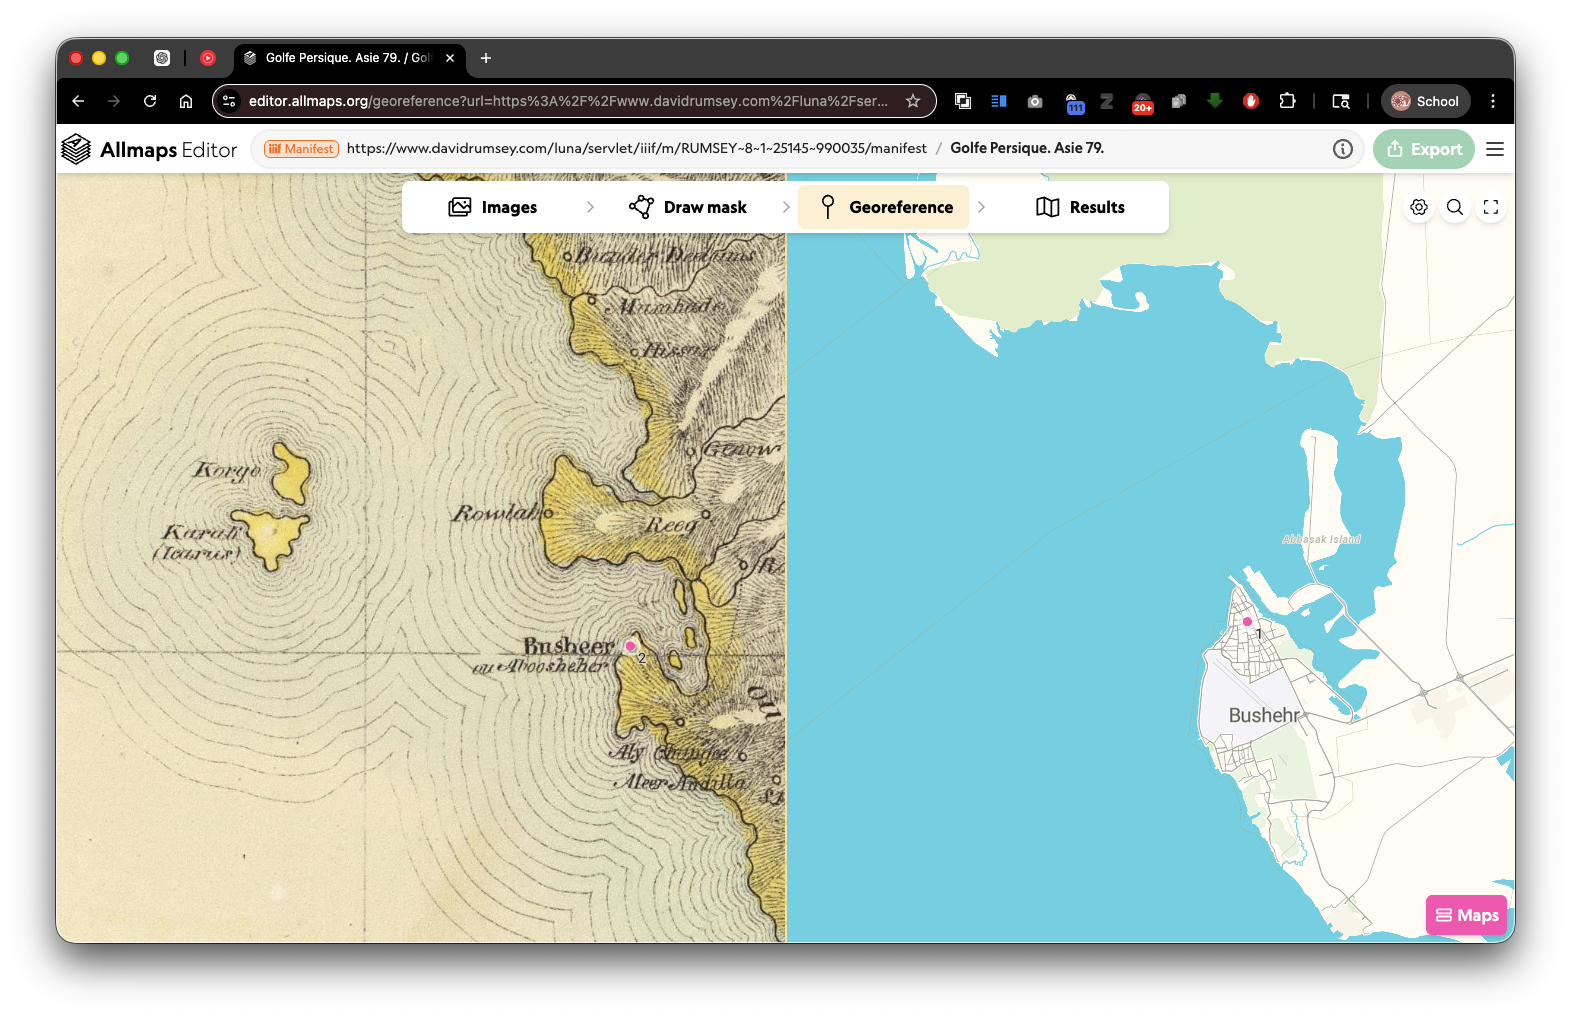
Click on the Historical Map:
- Identify a clear, identifiable feature (street intersection, building corner, bridge, prominent landmark, GRATICULES!!!)
- Click that exact point on the historical map in the left panel
- A circle marker will appear
-
Find the Same Point on the Modern Map:
- Now locate the same geographic feature on the modern reference map (right panel)
- Click that corresponding point
- Allmaps records this as a GCP pair
-
Repeat:
- Add additional GCPs by repeating steps 2-3
- Aim for at least 5-10 control points, spread across the map
- As you add GCPs, you’ll see the historical map begin to warp and align with the modern geography
Best Practices for GCP Selection:
- Precision: Zoom in on both maps when clicking; a few pixels can matter
- Spread: Distribute GCPs across the entire map area (corners, center, edges)
- Identifiable features: Use intersections, building corners, bridges, or distinctive landmarks
- Modern verification: You can cross-check your reference point on Google Maps or OpenStreetMap to ensure accuracy
Important: Examine Maps Carefully for Non-Standard Coordinates
Many historical maps include a graticule (coordinate grid) printed on them. Before assuming the coordinates shown are standard latitude/longitude:
- Check the Prime Meridian: Some historical maps use non-standard prime meridians (e.g., Paris, Berlin, or Ferro instead of Greenwich). The graticule may label coordinates relative to these historical reference points.
- Convert if Necessary: If a map uses a non-Greenwich prime meridian, you must convert those coordinates to standard Greenwich-based lat/lon before recording them as GCPs. Never record coordinates using a historical prime meridian.
-
Use Tools to Help: If a map has a graticule with a non-standard prime meridian, gather:
- The graticule’s latitude and longitude ranges
- The prime meridian used (e.g., “Paris Meridian”)
- The pixel coordinates of a few graticule intersections
Then use an AI tool like ChatGPT to calculate the correct Greenwich-based coordinates, which you can paste into Allmaps as GCPs. This can be remarkably accurate.
- Consult the Map Metadata: Check the map’s title, legend, or cartographic notes for information about the coordinate system used.
Conceptual Note: Georeferencing is as much art as science. Your GCPs define how the map is transformed to align with modern geography. The more GCPs you add, the more the software can correct for distortions in the original map (which is common in historical maps, due to printing and contemporary survey technologies). However, extremely high numbers of poorly-placed GCPs can introduce noise. Focus on accuracy over quantity.
Step 6: Reviewing and Editing the GCP List
Objective: View, refine, and remove problematic control points
Instructions:
-
Access the GCP List:
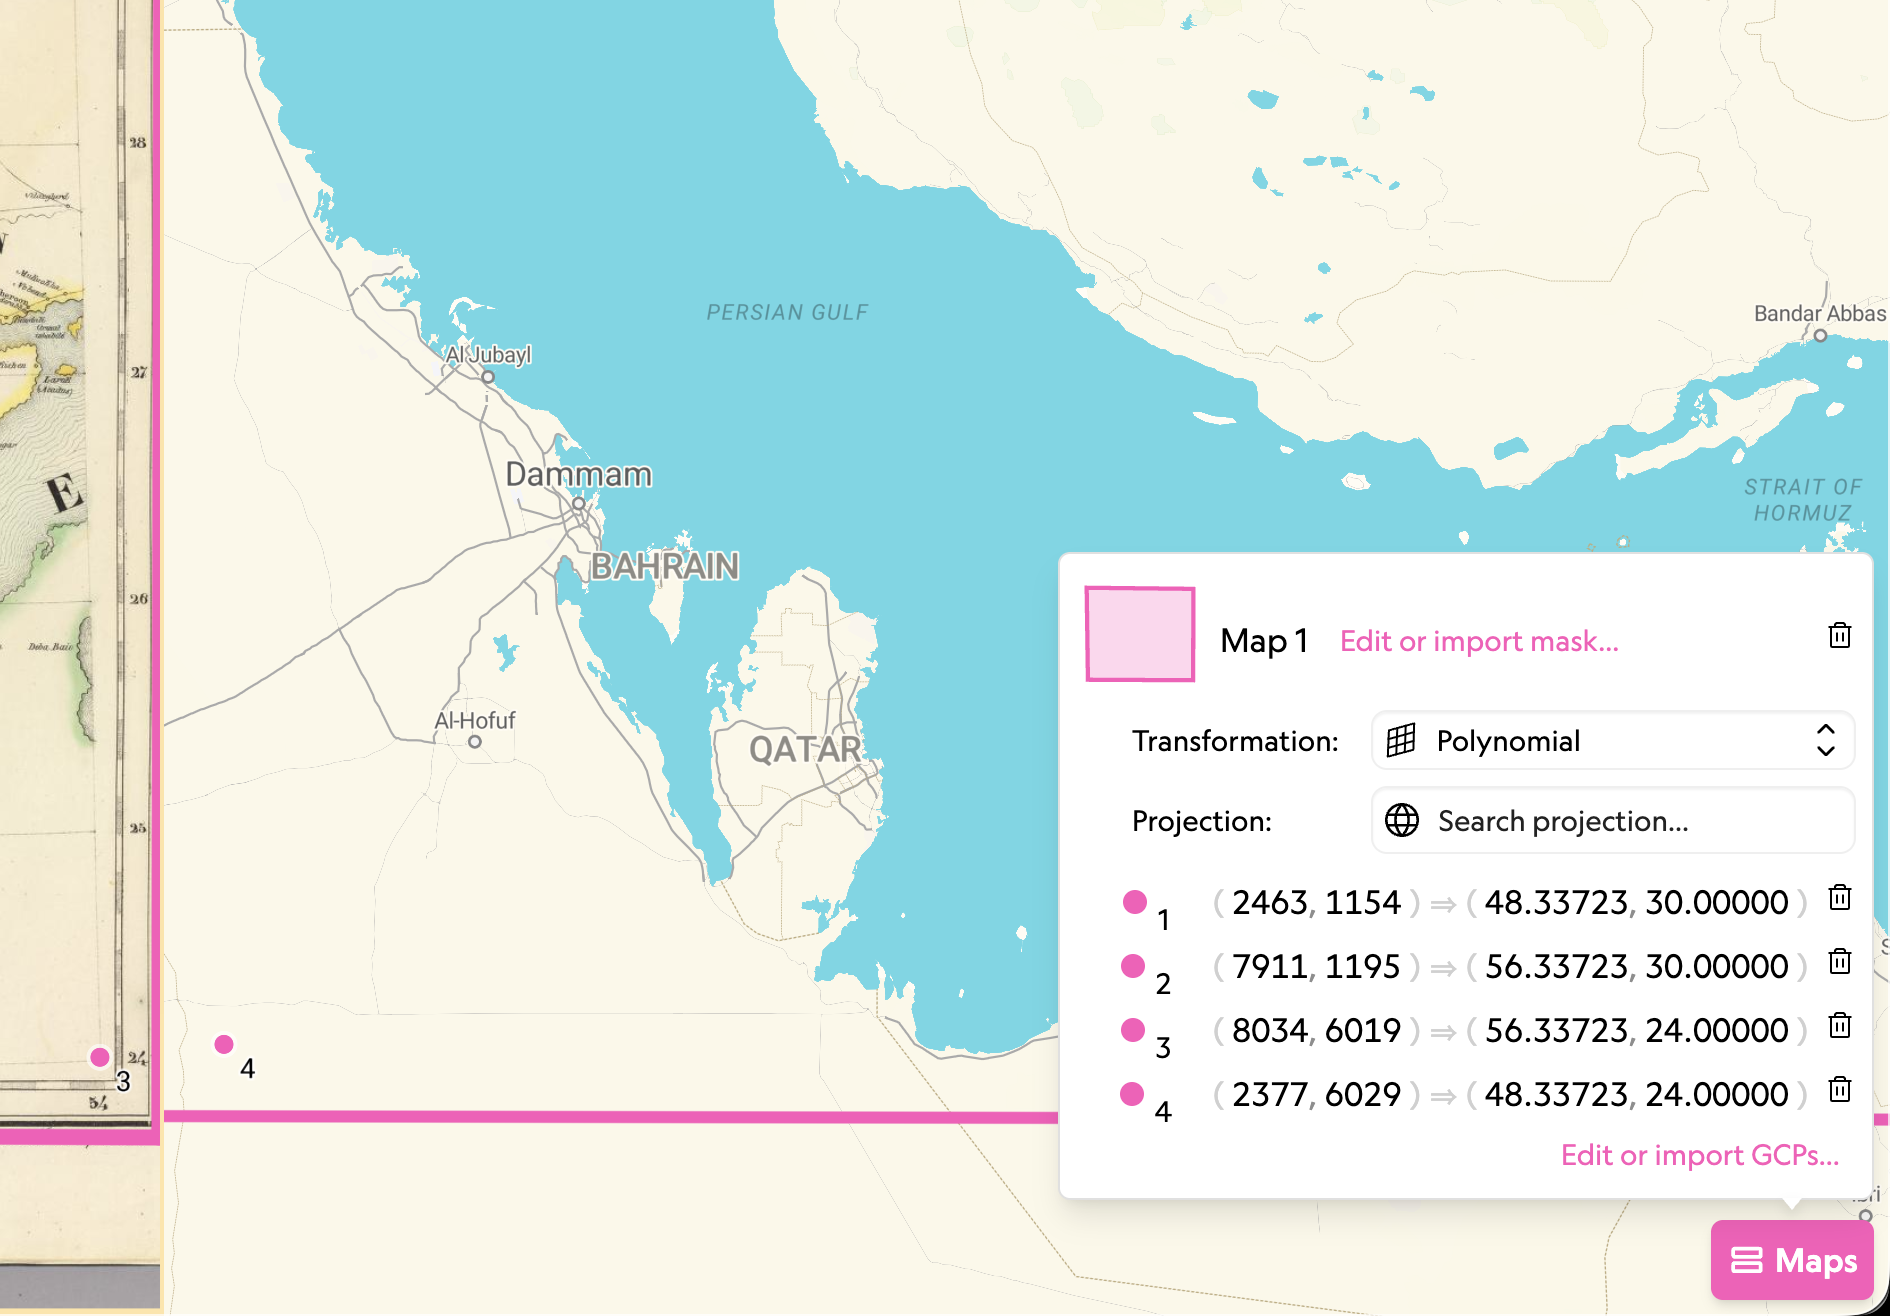
- On the right side of the editor, find the “Maps” panel
- This shows a list of all GCPs you’ve added
-
Reviewing Each GCP:
- Each GCP in the list shows:
- A numeric identifier for each GCP pair
- Image coordinates (pixel location on the historical map)
- Geographic coordinates (lat/lon on Earth)
- Click on any GCP in the list to highlight it on both maps
- Each GCP in the list shows:
-
Identifying Errors:
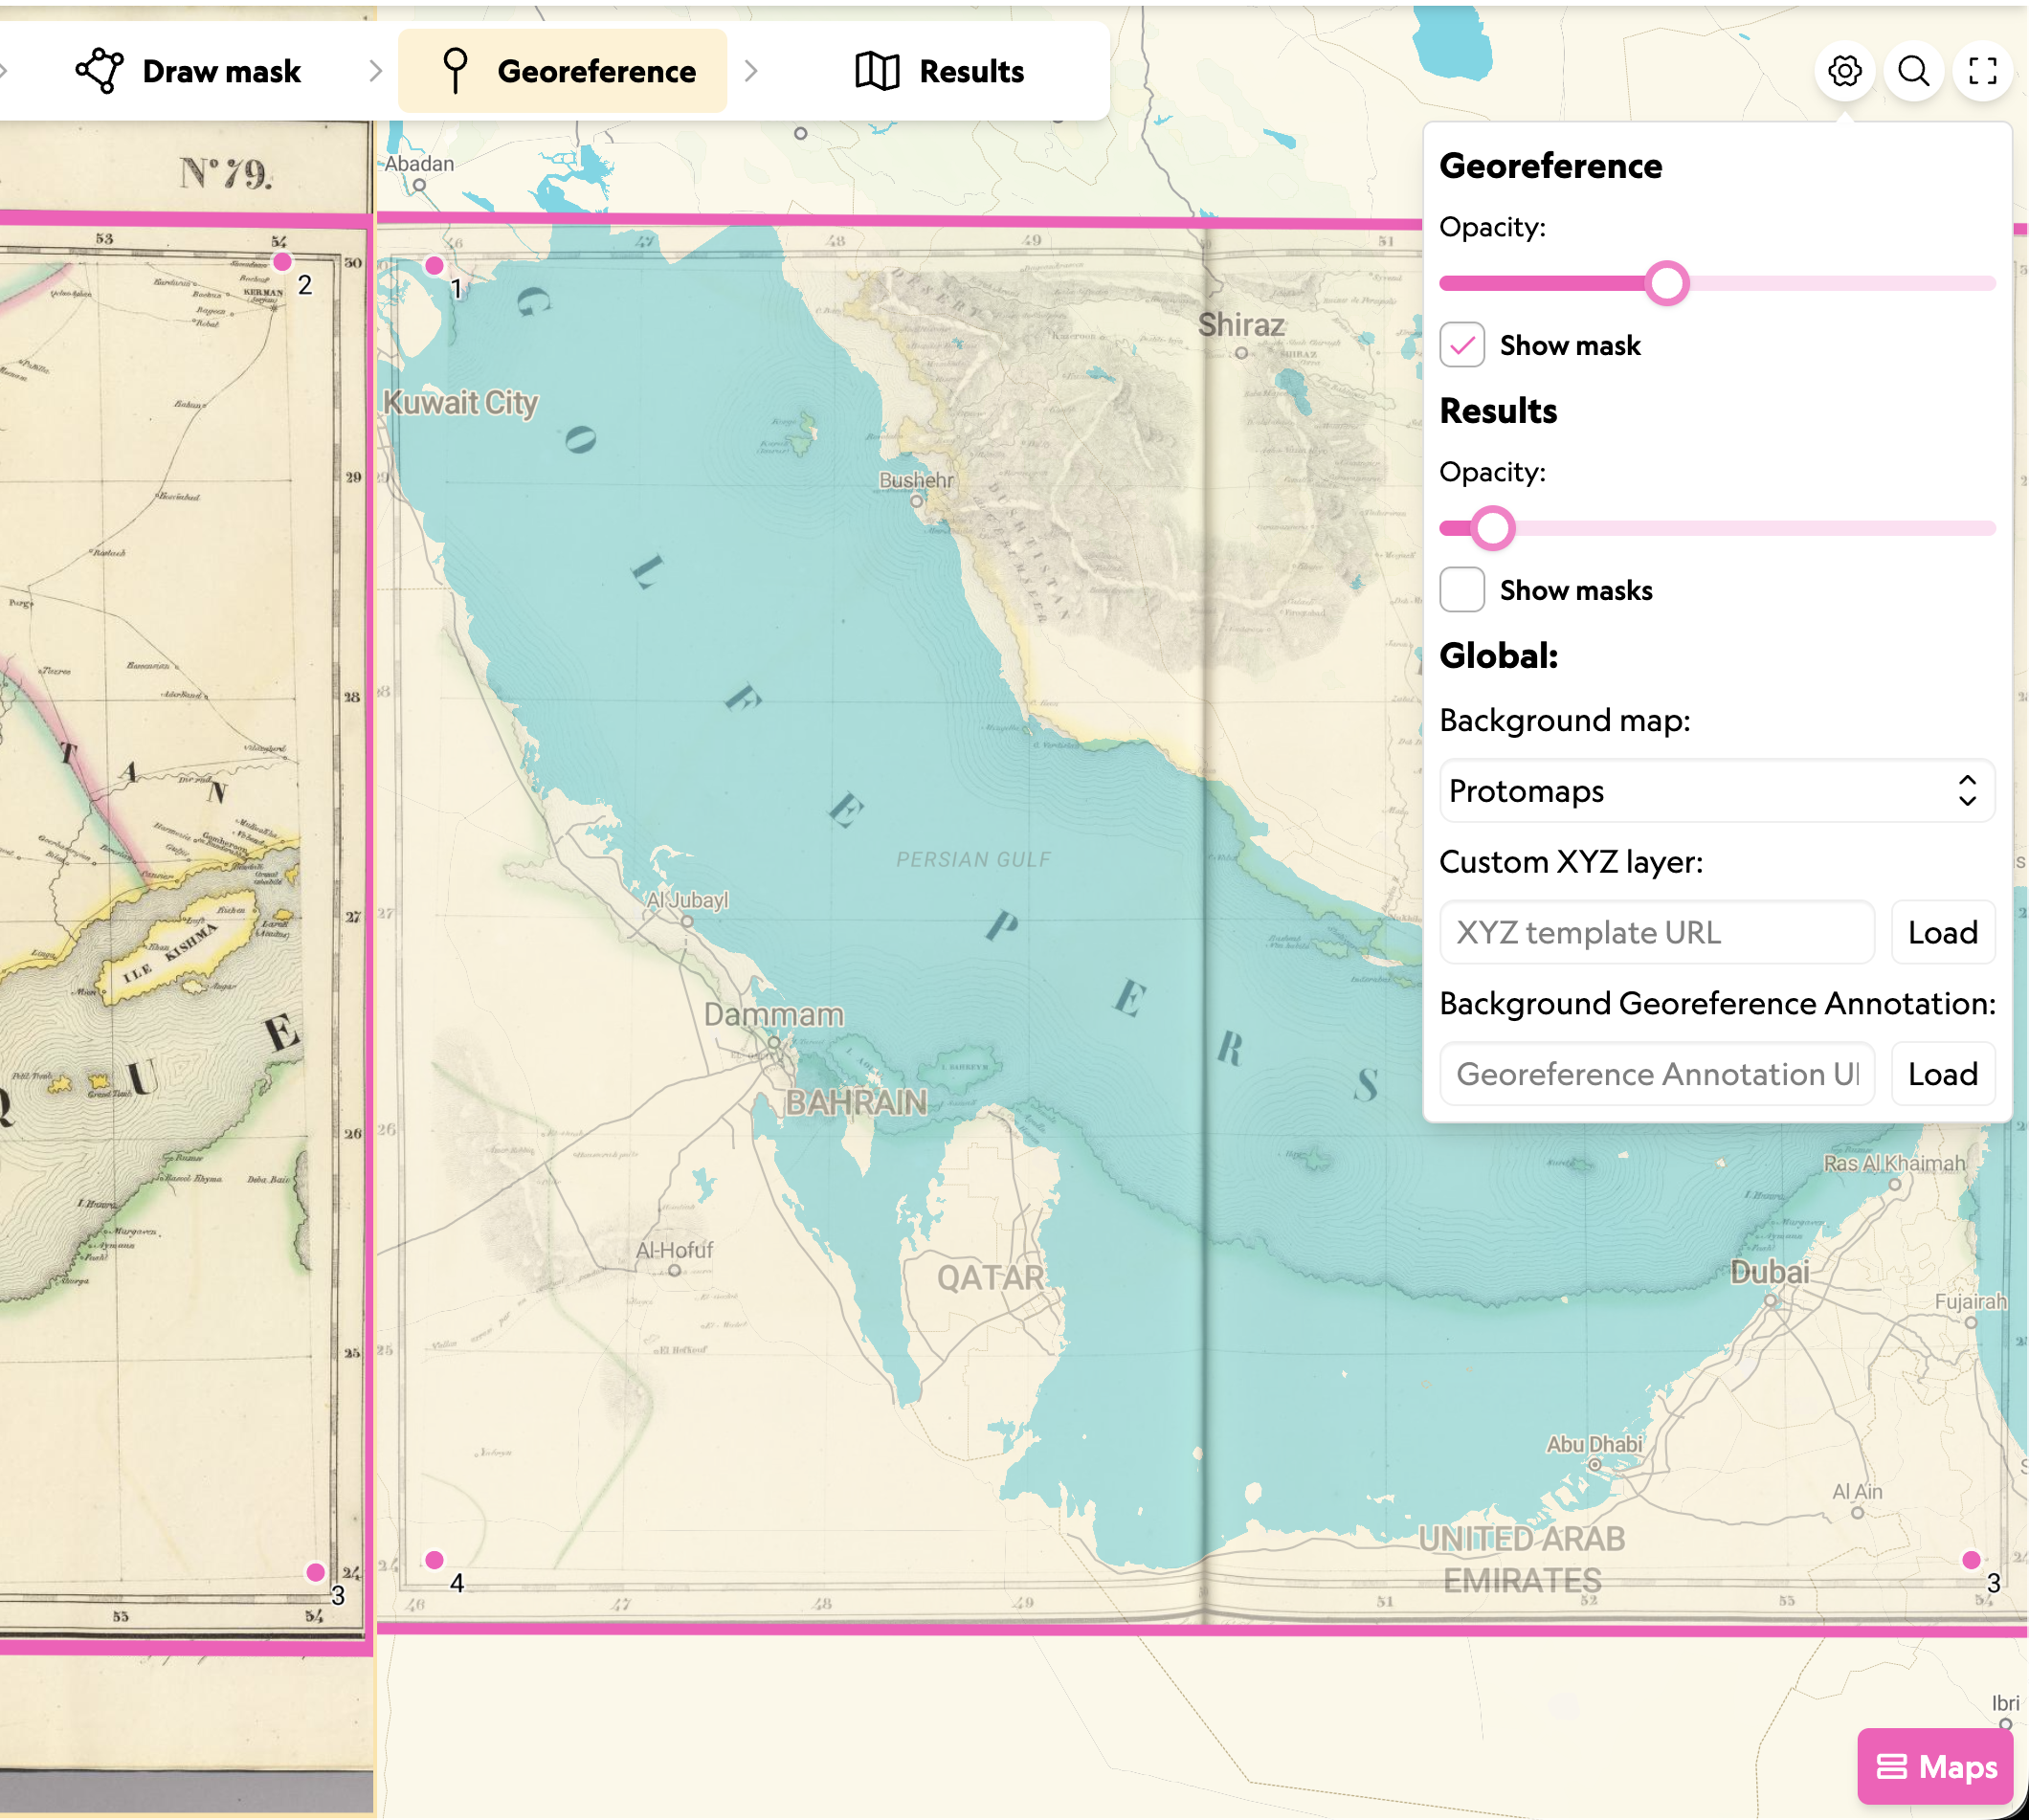
- Because there isn’t currently a “riesidual error” measurement available in Allmaps, this is a visual inspection.
- Use the Settings Panel to inspect the georeferencing by increasing the opacity of the scanned map in the reference layer.
-
Deleting Problematic GCPs:
- Click the “Delete” button for any GCPs that seem problematic, using the Trash icon
- Confirm the deletion
- Observe how the map transformation updates (it should improve if the GCP was erroneous)
-
Fine-Tuning:
- If the overall alignment is off in one area, add additional GCPs to that region
- If you’re unhappy with a GCP’s precision, delete it and re-create it with more careful clicking
Quality Check: After creating your GCP set, view the overall map alignment. Do street grids align? Do major landmarks match their modern positions? Zoom in on different areas to spot-check accuracy.
Step 7: Exporting Tiles
Objective: Generate XYZ tiles for use in web maps and other applications
Instructions:
-
Access the Exports Menu:
- Look for the “Export” button in the Allmaps Editor at the top
-
Copy the Tile URL:
- The Tile URL or Tile Service URL is immediately available.
- This will look something like:
https://allmaps.xyz/images/be75a1837d5d6eba/{z}/{x}/{y}@2x.png - Copy this URL
-
Using the Tiles:
- This URL can now be used in web mapping libraries:
- Leaflet: Use in
L.tileLayer() - QGIS: Add as an XYZ Tile Layer
- ArcGIS Online: Use the Add from URL Option
- Leaflet: Use in
- Example for Leaflet:
L.tileLayer('https://tiles.allmaps.org/[ID]/{z}/{x}/{y}.png').addTo(map);
- This URL can now be used in web mapping libraries:
What You’ve Accomplished:
- Your historical map is now georeferenced and accessible as a web-standard tile layer
- It can be instantly overlaid with modern maps, other historical maps, or GIS data
- The tile URL can be shared with others for use in their own projects
- No derivative files were created—just transformation metadata stored on the Allmaps platform
Part 3: Troubleshooting & Tips
Common Issues and Solutions
Issue: Map is severely warped or misaligned after adding GCPs
- Solution: You likely have an outlier GCP. Review the GCP list, identify misplaced points, delete them, and re-add with more precision.
Issue: Modern reference map doesn’t show the area I’m looking for
- Solution: Zoom out on the reference map, or if the map is of an extremely old or historical boundary, the modern map may not show those features. Use historical map layers in the reference (OpenStreetMap sometimes has historical map data).
Issue: Tiles aren’t updated at the XYZ Tile Layer
- Solution: Wait a bit, and try refreshing the view (Shift+Refresh, in a browser). Caching sometimes interferes with recieving the new tiles.
Best Practices
- Start Simple: Choose a historical map of a well-mapped area (U.S. East Coast cities, European capitals) before attempting remote or poorly-documented regions.
- Zoom and Precision: Always zoom in when clicking GCP points. A few pixels of error can compound across the map.
- Use Consistent Landmarks: If possible, use the same type of feature for all GCPs (e.g., all street intersections) rather than mixing landmark types.
- Backup Your GCPs: Download or export your GCP data periodically to avoid losing work.
- Iterate: Georeferencing is iterative. Start with 5 GCPs, check alignment, add more if needed.
Part 4: Next Steps
Once you’ve mastered georeferencing a single map, consider:
- Georeference multiple sheets of a map series and combine them
- Create a map collection using Allmaps Collections feature to group related maps
- Build a web application using Allmaps’ web components or APIs to create interactive historical map experiences
- Contribute to OpenStreetMap, OpenHistoricalMap or other open data projects using your georeferenced maps
Appendix: Key Links & Resources
- David Rumsey Map Collection
- MapRank Search (David Rumsey)
- Allmaps
- Allmaps Editor
- IIIF Documentation
- Web Mapping Guides:
- The examples map in this workshop, on DavidRumsey.com: https://www.davidrumsey.com/luna/servlet/detail/RUMSEY~8~1~25145~990035:Golfe-Persique–Asie-79-?sort=Pub_List_No_InitialSort%2CPub_Date%2CPub_List_No%2CSeries_No&mi=1&trs=2&qvq=q:990035;sort:Pub_List_No_InitialSort%2CPub_Date%2CPub_List_No%2CSeries_No;lc:RUMSEY~8~1
- The example map in this workshop, on Allmaps: https://editor.allmaps.org/results?url=https%3A%2F%2Fwww.davidrumsey.com%2Fluna%2Fservlet%2Fiiif%2Fm%2FRUMSEY%7E8%7E1%7E25145%7E990035%2Fmanifest&image=https%3A%2F%2Fwww.davidrumsey.com%2Fluna%2Fservlet%2Fiiif%2FRUMSEY%7E8%7E1%7E25145%7E990035
Workshop Created: April 2026 Version: 1.0