Step 4: Add Popups with Information
Live Demo: html/cog_map_step_04.html
Overview
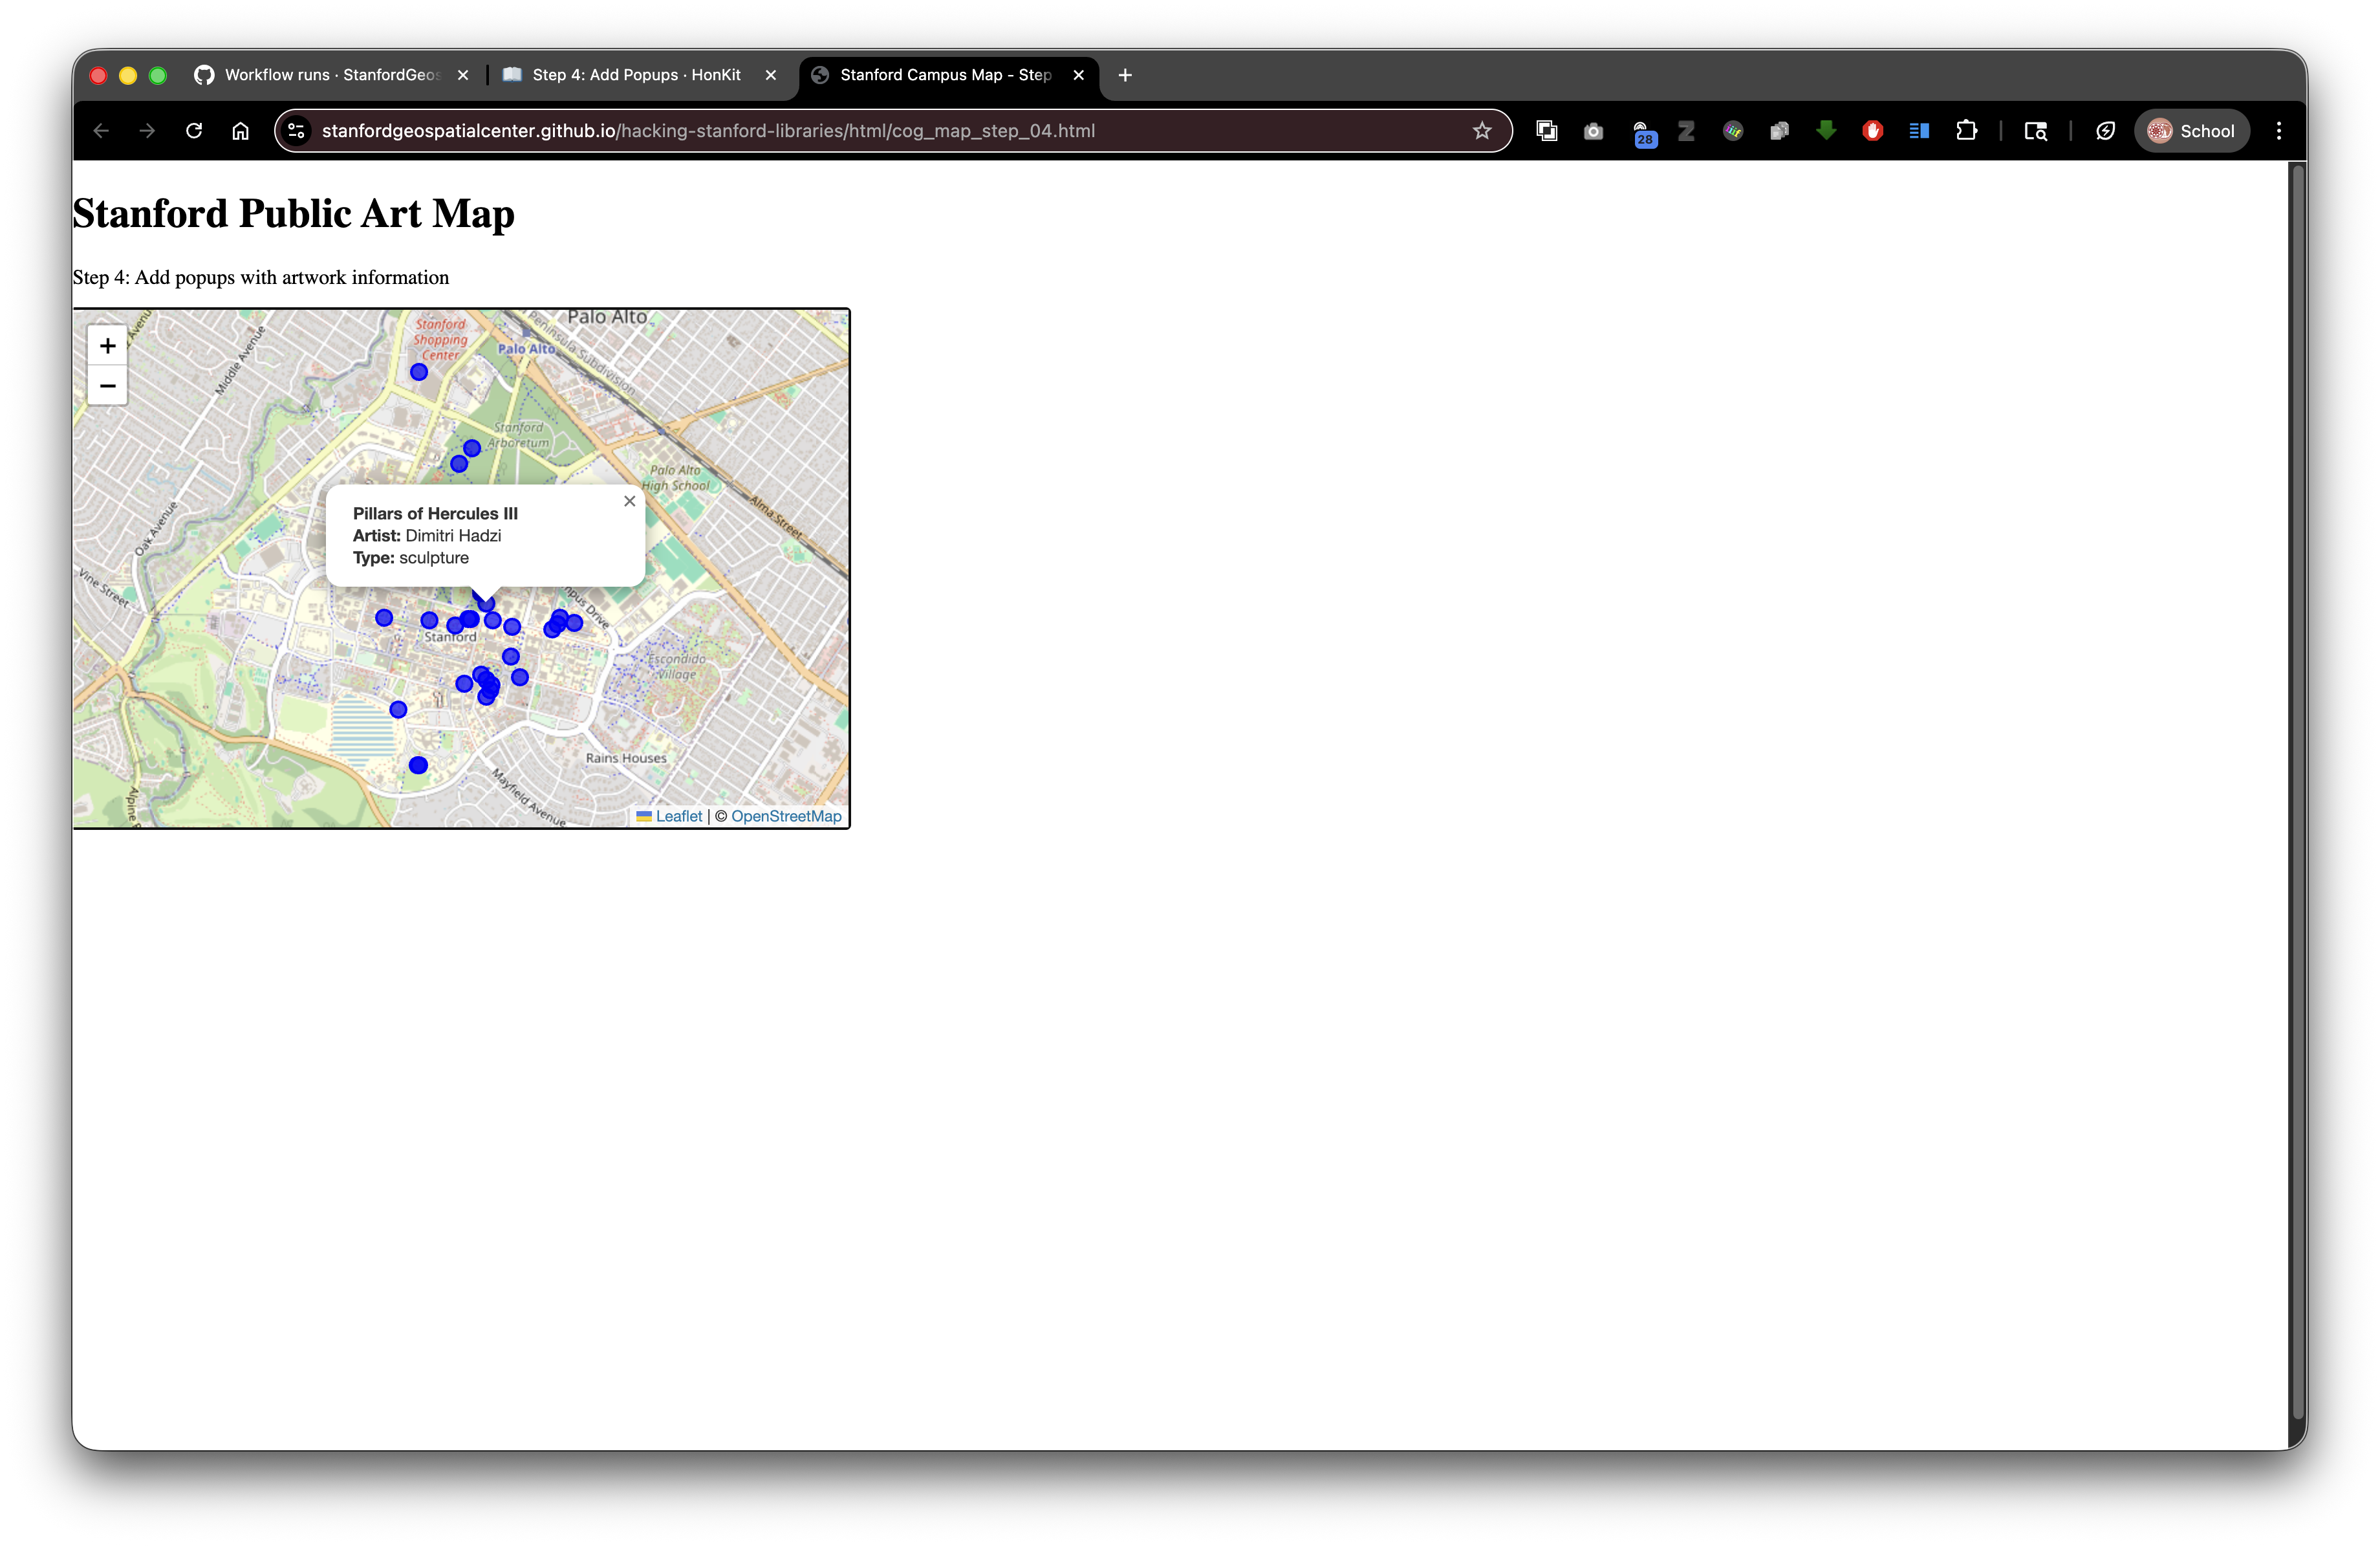
In this step, we'll make our map interactive by adding popups that display artwork information when users click on markers. This introduces working with feature properties and building dynamic HTML content.
Learning Objectives
- Bind popups to markers
- Access feature properties (attributes)
- Build HTML content dynamically with JavaScript
- Understand the
onEachFeaturecallback - Create user-friendly information displays
What are Popups?
Popups are small information windows that appear when you click on map features.
Think of them like: Tooltips or info cards that provide details about what you clicked.
Why use popups:
- Show detailed information without cluttering the map
- Make maps interactive and explorable
- Provide context about geographic features
- Create a better user experience
The Complete Code
<!DOCTYPE html>
<html lang="en">
<head>
<base target="_top">
<meta charset="utf-8">
<meta name="viewport" content="width=device-width, initial-scale=1">
<title>Stanford Campus Map - Step 4: Add Popups</title>
<link rel="stylesheet" href="https://unpkg.com/leaflet@1.9.4/dist/leaflet.css" integrity="sha256-p4NxAoJBhIIN+hmNHrzRCf9tD/miZyoHS5obTRR9BMY=" crossorigin=""/>
<script src="https://unpkg.com/leaflet@1.9.4/dist/leaflet.js" integrity="sha256-20nQCchB9co0qIjJZRGuk2/Z9VM+kNiyxNV1lvTlZBo=" crossorigin=""></script>
<style>
html, body {
height: 100%;
margin: 0;
}
.leaflet-container {
height: 400px;
width: 600px;
max-width: 100%;
max-height: 100%;
}
</style>
</head>
<body>
<h1>Stanford Public Art Map</h1>
<p>Step 4: Add popups with artwork information</p>
<div id="map" style="width: 600px; height: 400px;"></div>
<script>
// Initialize map centered on Stanford campus
const map = L.map('map').setView([37.427, -122.169], 15);
// Add OpenStreetMap tile layer
const tiles = L.tileLayer('https://tile.openstreetmap.org/{z}/{x}/{y}.png', {
maxZoom: 19,
attribution: '© <a href="http://www.openstreetmap.org/copyright">OpenStreetMap</a>'
}).addTo(map);
// Load GeoJSON data
fetch('collection/stanford_public_art.geojson')
.then(response => response.json())
.then(data => {
// Add GeoJSON layer with custom circle markers and popups
const artworkLayer = L.geoJSON(data, {
pointToLayer: function(feature, latlng) {
return L.circleMarker(latlng, {
radius: 6,
color: 'blue',
weight: 2,
fillColor: 'blue',
fillOpacity: 0.7
});
},
onEachFeature: function(feature, layer) {
const props = feature.properties || {};
const title = props.name || 'Artwork';
const artist = props.artist_name;
const type = props.artwork_type;
// Build popup content
let popupContent = '<div style="min-width:200px;">';
popupContent += '<b>' + title + '</b><br>';
if (artist) popupContent += '<b>Artist:</b> ' + artist + '<br>';
if (type) popupContent += '<b>Type:</b> ' + type;
popupContent += '</div>';
layer.bindPopup(popupContent);
}
}).addTo(map);
// Zoom to fit all markers
map.fitBounds(artworkLayer.getBounds());
})
.catch(error => console.error('Error loading GeoJSON:', error));
</script>
</body>
</html>
What's New?
1. The onEachFeature Callback
onEachFeature: function(feature, layer) {
    // This runs for each feature in your GeoJSON
}
What is onEachFeature? A function that runs once for every feature (point, line, polygon) in your GeoJSON.
When to use it:
- Bind popups or tooltips
- Attach event listeners (clicks, hovers)
- Style individual features based on their properties
- Add custom behavior to features
Parameters:
feature- The GeoJSON feature (with geometry and properties)layer- The Leaflet layer that was created for this feature (the circle marker)
Execution: If you have 50 artworks in your GeoJSON, this function runs 50 times (once per artwork).
2. Accessing Feature Properties Safely
const props = feature.properties || {};
const title = props.name || 'Artwork';
const artist = props.artist_name;
const type = props.artwork_type;
Breaking it down:
Line 1: Get properties safely
const props = feature.properties || {};
The || operator means "or" - if feature.properties doesn't exist, use an empty object {} instead.
Why? Prevents errors if a feature is missing properties.
Line 2: Get name with fallback
const title = props.name || 'Artwork';
If props.name doesn't exist or is empty, use the default value 'Artwork'.
Lines 3-4: Get other properties
const artist = props.artist_name;
const type = props.artwork_type;
These might be undefined if the properties don't exist - we'll handle that next.
3. Building HTML Content Dynamically
let popupContent = '<div style="min-width:200px;">';
popupContent += '<b>' + title + '</b><br>';
if (artist) popupContent += '<b>Artist:</b> ' + artist + '<br>';
if (type) popupContent += '<b>Type:</b> ' + type;
popupContent += '</div>';
What's happening: We're building an HTML string piece by piece.
Line by line:
1. Start with a div wrapper:
let popupContent = '<div style="min-width:200px;">';
let- A variable that can change (we'll add more content)<div style="min-width:200px;">- Container with minimum width (so popups aren't too narrow)
2. Add the title (always shown):
popupContent += '<b>' + title + '</b><br>';
+=- Append to the existing string<b>- Bold HTML tag+- String concatenation (joining text together)<br>- Line break (new line)
3. Conditionally add artist (only if it exists):
if (artist) popupContent += '<b>Artist:</b> ' + artist + '<br>';
if (artist)- Only run this ifartisthas a value (not undefined, not empty)- This prevents showing "Artist: undefined"
4. Conditionally add type:
if (type) popupContent += '<b>Type:</b> ' + type;
5. Close the div:
popupContent += '</div>';
Result: A string of HTML like:
<div style="min-width:200px;">
  <b>The Sieve of Eratosthenes</b><br>
  <b>Artist:</b> Mark di Suvero<br>
  <b>Type:</b> sculpture
</div>
4. Binding the Popup
layer.bindPopup(popupContent);
What this does: Attaches the HTML content as a popup to this marker.
layer - The circle marker we created in pointToLayer
When clicked: The popup opens automatically showing the HTML content.
Leaflet handles:
- Opening/closing the popup
- Positioning it near the marker
- Closing other popups when a new one opens
- Adding a close button
String Concatenation vs. Template Literals
The code above uses string concatenation with +:
'<b>Artist:</b> ' + artist + '<br>'
Modern alternative: Template literals (easier to read):
`<b>Artist:</b> ${artist}<br>`
Template literal features:
- Surrounded by backticks
`(not quotes) - Variables inserted with
${variableName} - Can span multiple lines
- More readable for complex HTML
Our popup rewritten with template literals:
const popupContent = `
  <div style="min-width:200px;">
    <b>${title}</b><br>
    ${artist ? `<b>Artist:</b> ${artist}<br>` : ''}
    ${type ? `<b>Type:</b> ${type}` : ''}
  </div>
`;
The ternary operator: condition ? valueIfTrue : valueIfFalse
Enhancing Popups with Styling
You can add inline CSS to make popups look better:
let popupContent = `
  <div style="
    min-width: 200px;
    font-family: Arial, sans-serif;
    padding: 10px;
  ">
    <h3 style="
      margin-top: 0;
      color: #1a73e8;
      font-size: 16px;
    ">${title}</h3>
    <p style="margin: 5px 0;">
      <strong>Artist:</strong> ${artist || 'Unknown'}
    </p>
    <p style="margin: 5px 0;">
      <strong>Type:</strong> ${type || 'Not specified'}
    </p>
  </div>
`;
Advanced: Adding Links to Digital Stacks
If your GeoJSON includes DRUIDs, you can link to the full record:
const druid = props.druid;
const purlUrl = `https://purl.stanford.edu/${druid}`;

let popupContent = `
  <div style="min-width:200px;">
    <b>${title}</b><br>
    ${artist ? `<b>Artist:</b> ${artist}<br>` : ''}
    ${druid ? `<a href="${purlUrl}" target="_blank">View in SDR</a>` : ''}
  </div>
`;
This creates a clickable link that opens the PURL page in a new tab.
Adding Images to Popups
If you have image URLs in your GeoJSON properties:
const imageUrl = props.image_url;

let popupContent = `
  <div style="min-width:250px;">
    ${imageUrl ? `<img src="${imageUrl}" style="width:100%; height:auto; margin-bottom:10px;">` : ''}
    <b>${title}</b><br>
    ${artist ? `<b>Artist:</b> ${artist}<br>` : ''}
  </div>
`;
For Digital Stacks images:
const imagePath = props.image_filename;
const imageUrl = `https://stacks.stanford.edu/file/druid:${props.druid}/${imagePath}`;
Try It Yourself
- Copy the complete code into
step-04.html - Open in your browser
- Click on any blue circle
You should see a popup with artwork information!
Experiments
Add more properties from your GeoJSON:
const material = props.material;
const year = props.inception;

if (material) popupContent += `<b>Material:</b> ${material}<br>`;
if (year) popupContent += `<b>Year:</b> ${year}<br>`;
Style the popup with colors:
popupContent = `
  <div style="
    background: linear-gradient(135deg, #667eea 0%, #764ba2 100%);
    color: white;
    padding: 15px;
    border-radius: 8px;
  ">
    <h3 style="margin:0 0 10px 0;">${title}</h3>
    <p style="margin:5px 0;"><strong>Artist:</strong> ${artist}</p>
  </div>
`;
Add emoji icons:
popupContent = `
  <div style="min-width:200px;">
    <h3>${title}</h3>
    ${artist ? `<b>Artist:</b> ${artist}<br>` : ''}
    ${type ? `<b>Type:</b> ${type}` : ''}
  </div>
`;
Popups in SDR Context
When you deposit your map to SDR:
- Popup content works exactly the same - it's just HTML strings
- Relative image references in popups need care:
const imageUrl = `images/${props.image_file}`; // Relative path - External links work fine (Wikidata, PURLs, etc.)
- Can reference other DRUIDs in popup links
Example combining local and external data:
const localImage = `images/${props.filename}`;  // From your deposit
const externalLink = `https://purl.stanford.edu/${props.related_druid}`;  // Another SDR object

popupContent = `
  <img src="${localImage}" style="width:100%;">
  <a href="${externalLink}" target="_blank">Related Collection</a>
`;
Common Mistakes
❌ Forgetting to check if properties exist:
popupContent += '<b>Artist:</b> ' + artist + '<br>';
// Shows "Artist: undefined" if artist doesn't exist
Check first:
if (artist) popupContent += '<b>Artist:</b> ' + artist + '<br>';
❌ Not closing HTML tags:
popupContent = '<div><b>' + title; // Missing closing tags
❌ Quotes inside quotes:
popupContent = "<div style="color:red">Text</div>"; // Breaks!
Use different quote types:
popupContent = '<div style="color:red">Text</div>';  // Works!
popupContent = `<div style="color:red">Text</div>`;  // Also works!
What's Next?
In Step 5: Cloud Optimized GeoTIFF from Digital Stacks, we'll add high-resolution aerial imagery from the Stanford Digital Repository!
Key Takeaways
onEachFeatureruns once for each feature in your GeoJSONlayer.bindPopup()attaches popup content to markers- Check if properties exist with
if (variable)before using them - Build HTML strings dynamically with concatenation or template literals
||operator provides default values- Popups can include HTML, styling, images, and links
- Works perfectly with SDR deposits using relative paths
Common Questions
Q: Can I have multiple popups open at once?
A: By default, Leaflet closes other popups when opening a new one. You can change this with autoClose: false in the popup options.
Q: How do I make popups open on hover instead of click?
A: Use layer.bindTooltip() instead of layer.bindPopup(), or add hover event listeners.
Q: Can I add buttons or interactive elements in popups?
A: Yes! You can include any HTML, including buttons with onclick handlers.
Q: How do I control popup width?
A: Set minWidth and maxWidth in the popup options, or use CSS in your HTML content.
Previous: Step 3: GeoJSON Points | Next: Step 5: COG from Digital Stacks